This article assumes that you have a Staging Environment Version of your WordPress site already set up and tested and are looking to move that site into a Live Environment.
1. Create Live Database
So assuming you do NOT have a Live Database set up at this stage we will first need to create our Live Server Database
- Go back to cPanel and go to the Database section.
- Click ‘MySQL Databases’
- Give your Live server DB a name — e.g. mysite_livedb
- Click Create Database
- Add a new User (or use the existing Staging DB user e.g. mysite_admin). We’ve found that using one Database user for both the Live and Staging servers makes copying the database from Staging to Live easier.
- Add that user to our new Database
2. Copy Staging DB to new Live DB
- Go To phpMyAdmin and select your STAGING Database from the list on the left.
- Click On The Operations Tab

3. Select the Copy Database To option. Enter in the name of your Live Database that you created in step 1, e.g. mysite_livedb. Remember to also deselect the CREATE DATABASE option if it is selected.

3. Run SQL Queries to Change URLs From Staging Versions to Live Versions
Your Staging URL (ORIGINAL_URL) will be something like: staging.yoursite.com
Your Live URL (NEW_URL) will then be something like: yoursite.com
UPDATE wp_options SET option_value = REPLACE(option_value, 'ORIGINAL_URL', 'NEW_URL');
UPDATE wp_postmeta SET meta_value = REPLACE(meta_value, 'ORIGINAL_URL', 'NEW_URL');
UPDATE wp_posts SET guid = REPLACE(guid, 'ORIGINAL_URL', 'NEW_URL');
UPDATE wp_posts SET post_content = REPLACE(post_content, 'ORIGINAL_URL', 'NEW_URL');
4. Copy Files In File manager
You should have a fresh, empty install of WordPress already installed waiting to be used after you set up your hosting with your provider. Our final step is to add our website files from the Staging server. Our empty Live WordPress site should be located at somewhere like: /public_html/
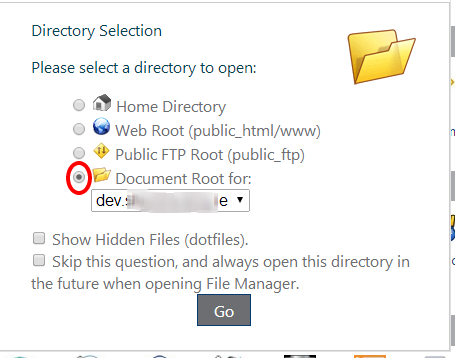
- Select File Manager in the cPanel

2. Select the Root folder for your Staging/Dev Server
3. You need to copy the Uploads, Plugins and Themes folders and their contents. All three are found in the wp_contents folder. Right click on the 3 folders one at a time and choose the Copy Option.
4. The next window will ask you where to copy the files to. This is super important. We need to ensure that the right folder is selected.
Where it says “Type the path you wish to copy” you should be able to leave this as it is, this should be the folder you have just right clicked.
In the text box at the very bottom will be the path being copied to. The path is usually set to the current path by default. We don’t want this, we want it set to our LIVE file location. So you will need to do something like this:
Replace: /public_html/staging/wp-content/
With: /public_html/wp-content/
i.e. remove the ‘staging’ text
5. Update wp-config
Almost there, we just need to update our wp-config file to contain our Live DB login details. You can access the wp-config.php file in the File Mamanger also and choose ‘Edit’.
- Use your Live DB user, password and database names.
6. Access the Live Site and Save Permalinks
- Navigate to the URL admin panel, e.g. http://mysite.com/wp-admin
- Login using your WordPress user credentials — should be same as local and staging site.
- Go to Settings in Dashboard -> General -> Click Save
- Go to Settings -> Permalink -> Click Save
- Ensure ‘Discourage search engines from indexing this site’ is unchecked